36 splitbox
The splitbox is a grouping object (similar to a groupbox) that divides the display area of its parent object into smaller, adjustable areas. The areas are separated by splitbars, which can be interactively moved with the mouse by the user in order to size them individually. Each visible child of a splitbox is assigned to a separate area and in each area only one direct child can be present. The size and the visibility of the children are set according to the size of the areas they are assigned to. To place more than one child in a split area, a groupbox or layoutbox must be used, which can then contain further children. With groupboxes as children split areas can have virtual sizes.
Definition
{ export | reexport } { model } splitbox { <Identifier> }
{
  <standard attributes>
  <plain attributes>
  <geometry attributes>
  <grid attributes>
  <hierarchy attributes>
  <hierarchy attribute>
  <object-specific attributes>
}
For each split area the size can be set individually. Additionally, minimum and maximum values can be set for the size that cannot be underrun or exceeded when moving the splitbars with the mouse.
The splitbars can be either horizontally or vertically directed.
Events
Children
Parents
Menu
36.1 Attributes
36.2 Specific Attributes
| Attribute | Desciption |
|---|---|
|
Determines the width of the splitbar in pixels. |
|
|
Determines how geometry is computed when a grid is used. Only effective for .borderwidth > 0. |
|
|
defines the style, i.e. representation and characteristics of the borders (since IDM version A.06.01.a) |
|
|
Sets the direction of the splitbars:
|
|
|
Sets the maximum size for split area I, which cannot be exceeded when resizing the split area with the mouse. .maxsize[0] acts as default value for all split areas that have no maxsize defined. See also chapters “Setting the Sizes of the Split Areas” and “Particularities”. |
|
|
Sets the minimum size for split area I, which cannot be underrun when resizing the split area with the mouse. .minsize[0] acts as default value for all split areas that have no minsize defined. See also chapters “Setting the Sizes of the Split Areas” and “Particularities”. |
|
|
Options of the splitbox; please refer to the “Attribute Reference” for details. Allowed indexes: opt_center_toolhelp (Microsoft Windows only) |
|
|
Returns the actual size of split area I. See also chapters “Setting the Sizes of the Split Areas” and “Particularities”. |
|
|
Defines the width (.direction = 1) or height (.direction = 2) of split area I. .size[0] is the default value for all split areas that have no size set. See also chapters “Setting the Sizes of the Split Areas” and “Particularities”. |
|
|
Sets a background image for the object. |
|
|
Controls how the background image set in .tile is arranged. |
36.2.1 Setting the Sizes of the Split Areas
The sizes of the individual split areas are defined through the .size[integer] attribute.
If interactive resizing by the user shall be limited between minimal and maximal sizes, these limits can be set in the attributes .minsize[integer] and .maxsize[integer].
For all three attributes, the value of the item with I = 0 is the default value for items that are not set. The values of the items 1 … .childcount are used for the particular split areas. The details of the interaction between these attributes, especially with resizing by the user, are explained in the subsequent chapters.
The current size of the split areas can be queried through the attribute .real_size[integer].
36.3 Particularities
Concerning the splitbox, special attention has to be paid to the layout, the geometry management, and constraints like an active size raster or the adherence of minimum and maximum sizes.
36.3.1 Size Raster
In contrast to other objects, which allow for the use of attributes like .xraster, .yraster and .reffont, the raster grid of the splitbox is not applied to the entire object but rather to the individual split areas. This avoids problems with rounding differences, which would be inevitable if one had to align separate split areas to a global raster while at the same time having to fit splitbars (with widths given in pixels) into the grid. Adapting the splitbar widths to raster units would look really bad in most cases. Relating the raster grid to the individual split areas solves these problems. Additionally this simplifies the usual calculation rule for pixel values. The common rule is pixel value = (raster value – 1) * raster. For calculating the sizes of split areas it is pixel value = raster value * raster.
36.3.2 How the Sizes of the Split Areas are Calculated
The algorithm outlined below is used to calculate the actual sizes of the split areas:
- The first approach is to assign each split area the size given in the .size[] attribute.
- If the first step yields, that more space is needed for all split areas including their splitbars than the object can provide with its constellation of geometry attributes like .width, .height, .xauto, .yauto, etc., the split areas are scaled down beginning at the right or bottom and obeying minimum sizes until all areas fit into the available space. If this cannot be achieved, for example because the sum of the minimum sizes (.minsize[I]) already exceeds the available space, the split areas are gone through once more starting at the right or bottom. This time they are diminished ignoring their minimum values. This may lead to split areas with size 0 at the right or bottom of the splitbox, for which only the splitbars remain visible. If the sizes of all split areas have been set to 0 and there still is too little space (the width of the splitbars altogether is larger than the splitbox dimension), the outermost split areas with their splitbars, for which the space does not suffice, are moved into the invisible area to the right or bottom.
- If after the first step less space is occupied than has been provided through the settings of the geometry attributes, the split areas are expanded until the entire space is utilized, but not beyond the maximum values given in .maxsize[I]. If the available space cannot be utilized completely with this approach, because the sum of all maximum sizes and splitbar widths is smaller than the splitbox dimension, the last split area is enlarged under defiance of its maximum size to fill the remaining space.
During this process the attributes .size[I], .minsize[I], and .maxsize[I] are not changed. The attributes keep the values given to them by the programmer, but these can be only partially respected due to the existing constraints. This property enables to recompute the widths of the split areas whenever the dimensions of the splitbox change. If, for example, a splitbox is attached to a window with .xauto=0 and .yauto=0, it can be observed how the split areas one after the other are reduced with and then without considering of the minimum values, when the window size is reduced interactively. When the window is enlarged again, the splitbars return to their original positions.
The values in .size[I] are only changed when they conflict with the minimum and maximum values in .minsize[I] and .maxsize[I]. The values in .minsize[I] have a higher priority for the IDM as the values in .maxsize[I].
In the case that the minimum and maximum values are violated, as described in steps 2 and 3 above, the affected splitbars can no longer be interactively moved since they already have illicit positions. However, dragging these splitbars changes the size of the respective split areas and sets new values in the size vector. As the attribute values in .size[I] change, resize events are triggered, although there is no visible change. So it can be handled programmatically that the original values in the size vector have been changed through user interaction. When the same splitbars are dragged once more, again there will be not visible change as the restrictions resulting from the minimum and maximum values are still in force. This time no further resize events are sent since the suitable values in size[I] had already been set with the first drag.
A particularity has to be noted concerning size raster. Since it is virtually impossible to perfectly fit the sizes of all split areas to the size raster with the adaptation process described above, normally there will be one (and no more than one) split area whose size is no multiple of the grid size. This applies to the split area that has lastly been adapted by the described algorithm.
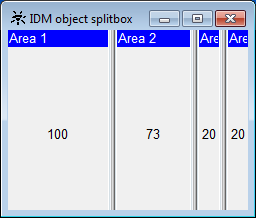
The following is an example for this situation:
Let there be a splitbox with .direction = 1, .size[0] = 10 and .minsize[0] = 2. Size raster is activated and .xraster = 10. The splitbox is tied to its father object with .xauto = 0 and .yauto = 0. This splitbox is depicted below. Due to external constraints not all values from the .size[I] vector can be satisfied. The two split areas to the right already reached their minimum sizes of 20 pixels. The first split area has the desired size of 100 pixels. The second split area from the left has been changed last by the described algorithm and could not be fitted into the size raster.
36.3.3 Interactive Resizing
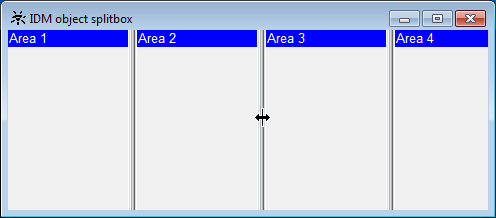
A typical use of the splitbox is that the user can interactively change the sizes of the split areas. Therefor the mouse cursor has to be positioned on one of the splitbars. As shown in the image below the shape of the mouse cursor changes on the splitbars.
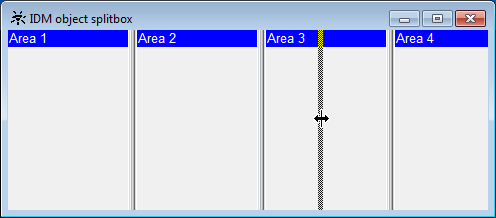
Then the splitbar can be dragged by moving the mouse right or left (in this case) with the left button pressed until the desired size of the split areas is reached. The following image shows that as a visual feedback a dimmed splitbar is displayed which follows the mouse cursor while dragging. If one of the maximum or minimum sizes is violated while the splitbar is moved (i.e. the maximum size of the second area is exceeded or the minimum size of the third area is underrun), the dimmed splitbar remains at the last valid position.
On Microsoft Windows the resizing of a split area can be canceled with the Escape key.
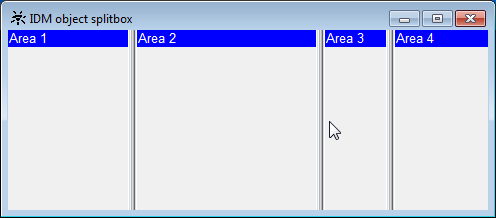
When the desired size has been reached, the left mouse button can be released. Now the splitbox sets the new sizes of the split areas. The result is shown in the next image.
Now, up to two resize events are sent. One, which notifies that the size of the second split area has changed (of relevance is a new value in the size vector; no event is triggered if the respective value remains unchanged). In thisevent.index the (one-based) index of the child object in the affected split area is registered. The second resize event belongs to the change of the third split area. Accordingly, thisevent.index is set to the index of the third splitbox child.
Note
When .sizeraster is set to true on the splitbox, this has no effect while dragging a splitbar. It is moved simultaneously with the mouse cursor. Only after the splitbar is released, it snaps to the closest upper or left grid position so that the adjacent split areas fit into the size raster.
36.4 Example
A simple use of the splitbox can look like this:
dialog Dialog
window W
{
.title "splitbox demo ";
.width 400;
.height 400;
child splitbox Splbox
{
.xauto 0;
.yauto 0;
.xleft 5;
.xright 5;
.ytop 5;
.ybottom 50;
.size[0] 50;
.minsize[0] 20;
.maxsize[0] 100;
child pushbutton Pb1
{
.text "in section 1";
}
child statictext St1
{
.text "in section 2";
.yauto -1;
.xauto -1;
}
child groupbox Gb1
{
.xauto 0;
.yauto 0;
.xleft 4;
.xright 4;
.ytop 4;
.ybottom 4;
}
child treeview Tv
{
.xauto 0;
.yauto 0;
.xleft 4;
.xright 4;
.ytop 4;
.ybottom 4;
.content[1] "one ";
.content[2] "a";
.content[3] "b";
.content[4] "c";
.content[5] "two ";
.content[6] "d";
.content[7] "three ";
.content[8] "four ";
.content[9] "e";
.content[10] "f";
.content[11] "g";
.level[2] 2;
.level[3] 2;
.level[4] 2;
.level[6] 2;
.level[9] 2;
.level[10] 2;
.level[11] 2;
.firstchar 1;
.editable true;
.style[style_lines] true;
.style[style_buttons] true;
.style[style_root] true;
.selstyle multiple;
}
}
on close { exit(); }
}